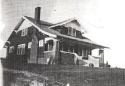
 Here is a record of our restoration of a 1928 craftsman. We will be the second family to live in the home. Watch our progress when we prevail and our privation and pratfalls as we do not.


They are a battery powered LED light that clips to the underside of your ballcap! What a great idea. I threw it in with the brass screws I got and the two sash lifts. I was purchasing these because I was finally getting some hardware on the upstairs windows.

The upstairs windows were pretty unbelievable when I started in on them. For 79 years they have been up in place, and because upstairs was all attic originally, the interior side of the windows had never been finished. 79 years of attic gunk building up on raw wood. Of course since it was attic there were only screens on the windows, never storms, and there were bad water stains. When we finished the upstairs, I trimmed the windows but not until the last month had a I started in on the double hungs themselves.
Here is a shot of a window before I started

I am missing pics of a few steps but here is what I did:
STEP ONE
I took the windows out and sanded both sides, I used 100 grit, then 150, then 220 on the interior. For the extrerior I used 80 to take off loose paint. I also knocked off all loose glazing. I vacuumed and tack clothed off all the sawdust. I put boiled linseed oil on all exposed wood on the exterior side.

STEP TWO
I glazed the exteriors. After finishing a window I would flip it over and use a 2 part wood bleach to lighten the water stains. I’d let that sit overnight and then sand and wash with vinegar.

After letting that sit overnight I would hit the interior side with boiled linseed oil.

STEP THREE
After waiting a few more days to let the glazing skin a little I put sealer on the interior to get an even stain then I stained the interiors. After letting that sit over night I put on two coats of polyurethane varnish. Once that was finshed I primed the exteriors and then put on two coats of industrial enamel.
STEP FOUR
I installed the windows and then eventually got around to putting the sash locks back on, but none of the windows had sash lifts I manged to have 5 salvaged ones so I had to pick up a few more hence the trip to the hardware store. The hardest part was trying to see where my pencil marks for the sash lift screws were so I could drill pilot holes

But luckily since I had my attach to the ballcap LED light, I was able to find them

Here is how a window looked with lift in place:

And since you'd much rather see what's outside the window there's a shot of that too:

No comments:
Post a Comment