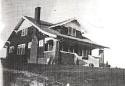
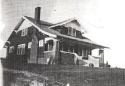
 Here is a record of our restoration of a 1928 craftsman. We will be the second family to live in the home. Watch our progress when we prevail and our privation and pratfalls as we do not.
Here's what it looked like as I started. The picture rail is just below the ceiling. I've never hung border directly onto a painted wall, our old house had every room papered except the hallways.

I am a big fan of red rosin paper. I have two basic work areas when hanging paper: the cutting area and the pasting area. Each one gets a generous helping of rosin paper. Here is the cutting area:

The tools here are my 18 inch right angle, pencils, scissors, razor blades and measuring tape. (Tape really isn't critical for borders until the end I suppose.)
Here is the pasting area. As I said, I'm a big fan of rosin paper. I also use some of that cheesy vinyl carpet protecter your great aunt had in her living room. It's great for keeping the paste in the area you need it and I find I'm less likely to accidently step into the paste.

I use a regular wheat paste type glue, buy the stuff as powder and mix up in a big bucket. Bradbury (the paper maker) recommended putting glue on with a roller. I did the first piece that way and immediately went into the basement for my brush. Overkill for border, but I always put an arrow at the top of the back side of every piece of paper before I put paste on to make sure I'm not hanging upside down when I get up the ladder.
After pasting the back you are to "book" the piece. In this case it means folding the ends in toward the middle. I always make the side I'm hanging first a little smaller than other side. It just seems to be easier to handle that way.

Then you roll it up and let the paste soak into the paper. Brabury papers are NOT pre-pasted. They aren't trimmed either, that's a fun job I'll have to document in a future post. Directions say wait 5 minutes before hanging. I like to wait 10.

Here is the first section put up in place. This border has a 13.5 inch repeat. I cut my first length 3 repeats long (40.5 inches). That's a pretty easy length to handle especially for a first piece.

I do a lot of calculations before I start to hang, I figure room perimeter, divide that total by the pattern repeat, figure each wall separately, and then don't look at it once I start working. I did remember that my pattern repeat for the room would be 49.2. I decided to overlap each piece between and an eighth and a quarter of an inch to try to get rid of the extra 2.7 inches I'd have left at the end.
I got down the first wall pretty easily. At corners I always take a razor blade and slit the border so that each wall is separate. I didn't do that on one job at our previous home and that's where the border came loose, in the corners.

I seem to have over corrected a bit much, I came in with just over 50 frieze sections instead of 49. I knew I needed a funky bit to finish up, and to my surprise the sample border piece, that has been hanging on the wall since March, was nearly an exact fit!

So I peeled the info label off the back (here's another great use for red rosin paper) and slapped the paste on it. It hung great.

Here's a picture right after I finished. Tonight Lisa washed off the excess paste and we'll put the rest of the furniture back in tomorrow.

No comments:
Post a Comment