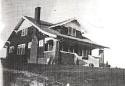
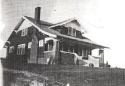
Thursday, June 28, 2007

Weighty Matters

I have been thinking as I have been moving limestone from our old house to Foxcroft. I took a load of rock on Sunday in my station wagon, Pete and I took a load on Monday with his truck. I took two loads on Tuesday in my wagon. I took another load on Wednesday in my wagon. Today I got the last of the limestone by using Pete's truck. I'm generally a pretty good estimator, I think I've moved somewhere in the neighborhood of 3.5 tons of limestone. Besides using my aching back as a guide, I figure that the new owner of our place took about about 35% of the total I had built in the back and I know I put in a total of 10 tons of limestone so...
Here is how it looked on Wednesday:


I was working along with my board and level and got nearly half of the middle section laid. Here's another shot of working:


I am grateful to Brian, the owner of our old house, besides being a nice guy I got enough stone to build the entire patio/swimming pool base.

After getting all the rock home it was time to head to Iowa River Products to get some lime waste to use as filler between the stones. "Lime waste" is basically pulverized limestone gravel that is a by-product of gravel quarrying. Farmers will use this on their fields if they are too acidic, and you can use it in mortars. I used this stuff on my previous patio too. It packs firmly but does allow water to drain through. Pete's truck was invaluable in this operation as you pull up to a mountainous pile of lime waste and an end loader dumps into your truck. I stopped the guy when I saw the bed move signifigantly and thought I'd probably have enough to do the whole job. When I got back to the scale I had .55 tons, 1100 pounds of lime waste. This stuff sells for the princely figure of 10 dollars a ton, so I handed the scale master $5.25 and was on my merry way. If you look at the last post you will see that I am now over $50 in this project. Here's is Pete's truck in the neighbors driveway that is closer to the patio, so I unloaded from there. Here is what half a ton of lime waste looks like:


The first section was ready to go so I loaded a wheelbarrow full and dumped it on and brushed it all around. I use a push broom and a regular broom to spread:


I still didn't have the middle sections completeley laid and leveled so I did that and then brushed them too. I started laying the last section and was halfway done when supper was ready. After supper I came out and finished the last section:


I then covered it too. I have about two wheelbarrow loads left in the truck. Here is younger daughter, who was my shoveling assistant most of the afternoon:


After brushing it all out, I wet it all down with the hose. I'll tamp on it some tomorrow and then dump the rest of the lime on it. We should be putting up the pool on Saturday.

Tuesday, June 26, 2007

Level Headed

For the sake of the rest of my family I spent yesterday working on the patio that will be the base for the girls' pool. My goal is to get this thing done this week so they can play in it. An added benefit is that it's pretty nice to sit in after a hot day of scraping paint.

I started yesterday by making a level line to work from roughly 1/3 of the way across. I set bricks on edge and made sure they were level with my two benchmark points. I used my string levels and a 14' and 8' board to check as I worked.


After completing the first I did another line of bricks following the same steps as above:


Then I decided to have some fun and make a line from one level line to the other making a capital "H" for our surname:


To make it even better I laid out the cross line so that it extends a line from the curve on the sidewalk through the path to the gate for the old vegetable garden yard. (which sadly is no longer part of our property)


Then Pete came over we went out to the dump to get rid of some of his construction debris, dropped a few things off at the salvage barn, and came back to get my car. We drove separately to lunch so that I could take his truck after we ate to go get more stone from our old house. The current owner is re-doing the back and reduced my limestone patio by a third and removed all the walks I had built. He graciously said I could take all the left over rock I wanted.

Here is a pic of me laying that patio eight years ago The remodel has removed all the patio beyond the pergola posts (which hadn't yet been laid when this picture was taken!:


By buying Pete's lunch I got him to come along and help me load some stone.

The mason was working there when we arrived and after introductions he complimented my on my work there, his makeover was quite easy he said. He mentioned that the quality and thickness of the Anamosa limestone I used was unavailable today. The apocryphal story is that architect Frank Geary, who designed the advanced technology lab at the UI came and went to Weber Quarry (where most local limestone comes from) and fell in love with the stuff, now he is specifying it on all his major jobs, ergo nothing of quality is available for the locals. (Like I say this is completely without any verification)

We loaded up some stone and I went home. After unloading the truck, Pete's daughter, who is our babysitter, drove it home. She'll come today in our car, that Pete drove home. I worked some after dinner last night. First I removed all the stone that I had gotten on Sunday and put down landscape fabric in the first third. I don't really think the fabric does any good for the way I construct these things, but it gives me something nice and dry to step on:


I am using my boards to make sure I'm still level as I place stone. This part is the giant jigsaw step. What's funny is that as I place stone I recognize many of the pieces from when I placed them before. So here is how it looked at 8:00 when I went in to put the girls to bed:


Today I'll get some more rock, and get some ag lime to start to fill between the rocks.

So to tote up expenses so far:

Limestone I bought before I talked to Brian $35.00
Pete's lunch $6.00
Landscape fabric $6.98

Total $47.98

Everything else I salvaged.

Monday, June 25, 2007

The Week in Review

I've been juggling several projects at once so here is a quick rundown:

Painting in back- I started under the eaves. I've been scraping loose stuff, sanding and painting. Here's how it looked at the end of Monday, you can see that the last two rafters are painted a darker color:


And here's where I was by Thursday:


To give a better idea of how it looks:


It rained buckets on Thursday. From Thursday 8:00 AM to Friday 8:00 AM we got 5.1 inches of rain. Most of it fell Thursday night. Therefore I decided to work inside on Friday and put up the border paper in the living room. This border matches the dining room.

Here is the first piece next to the chimney:


And roughly the same area when I was finished:


We rearranged the living room into a "Summer setting." We put the small couch up in front of the fireplace and moved the chair away from the fireplace. It makes a nice change of pace.

Another thing going on last week was a new water main. The city dug a big hole at the top of the street and a bigger one at the bottom. In between they dug 8 "observation holes." All of this is happened on the other side of the street. The new main will run under the sidewalk (we don't have a sidewalk on our side of the street) Here is a view down the street from in front of our place:


You can see four of the holes as outlined in orange fencing. They dug the line with a horizontal bore, just like we did our geothermal system. The drill rig was at the top of the street and they went all the way to the bottom (3 blocks) in a little over one day. When the bore was finished they threaded the pipe in from the bottom by pulling it through as the bore was pulled back to the top. Very slick. Here is a shot of them working across the street while threading the main:


Eventually when the main is ready they will then bore under the street at each house to hook up our side.

The last thing I've been working on hasn't been as successful, yet. I need to level a space for the girls' swimming pool. This is a big inflatable thing that is 12 feet in diameter. Last year we put it up on uneven ground (there is no where in our yard that is that big AND flat. So last week I worked to level a space. It has turned into digging down, laying paving brick and limestone that it looks like I'll salvage from our old house. The current owners changed the back patio and asked if I wanted the stone left over that they removed. Being the scrounge I am, of course I said yes. So what I have now is a 13.5 x 15 foot oval that is nearly level on the outside but needs to be filled in with stones and dirt. With any luck I'll have this thing finished the week before school starts again...

Monday, June 18, 2007

Ding Dong Ditch

I'd been thinking about a new doorbell for a while, but it certainly wasn't high on the priority list. However I spotted this one on ebay and decided to bid on it:


And for the princely sum of $9.00 the "Hacienda" (the model name) was mine, plus the 10 bucks for shipping. I was the only bidder. Here is another picture of it:


It arrived last week and I set about to learn how to put up a doorbell. The box for our bell is located in the hallway off the dining room. I got the old one (a plastic NuTone, just like the one I bought, but this one was probably from the 1970's) off easily enough.

There are three wires coming from the wall, one for back door, one for the front and the third wire connects to the screw on the box labelled "transformer." The third wire is what completes the circuit when ringing the bell. On both the current and the newly purchased bells there are two chimes. The front door rings both, and the back door rings only one. The mechanical set up is interesting. There are two plungers set labeled front and back. The plungers have a spring attached to one end and they pass through the transformer box. For the back door plunger there is a stop which prevents it from hitting one of the chimes. For the front the idea is that the plunger hits one chime, and the spring then causes it to rebound and strike the other chime.


I got the whole thing up in a jiffy. I then proudly went to test and rang the back door: no problem. I marched to the front and got nothing. Zilch. Nada. I made the youngest daughter go ring the doorbell about 50 times while I climbed back up on a chair and watched what happened. I appeared that the front door plunger was stuck.

I took the thing down and discovered that the transformer came off by removing two screws from the back. I finally got it apart and with a decisive blow got the plunger out, it was corroded. The directions on the transformer say quite plainly "DO NOT OIL." So I got a little 0000 steel wool out and pushed the spring back and tried to clean the plunger. I reassembled and hung it up and still nothing. I did it again, and got the plunger to fire but it only hit one chime, making it impossible to tell back door from front.

To summarize I have spent the past week trying different cleaning methods: rubbing alcohol, etc. and finally even got the spring off and went to the hardware store to get a different one, but nothing was going to fix it.

In desparation I got the previous doorbell out and looked closely at it. I decided to tear it apart, because unlike the "Hacienda" the transformer wouldn't unscrew. I hadn't paid much attention to it originally because on that one the chimes were mounted above and below instead of side to side, so I didn't think I could switch transformers. But I did manage to get one plunger out and took the spring from it and switched with the front, and EUREKA! The doorbell in front now works.

Of course I'll need to take the whole thing down in about 2 weeks when we paint the hallway. Lisa also says it's a little too shiny, but I told her to just wait, I've handlede the thing so much in the last week it will start tarnishing in no time!

Thursday, June 14, 2007

A Week of Reprises

I’ve been splitting my time the last few days between Foxcroft and Pete’s house and doing projects in new settings using old skills.

I started prepping for painting here at home. Since I spent six years painting the old place, it feels pretty familiar. The good news is that most of the paint on the eaves trim is tight, so I’m not heat gunning everything off like I did before. The better news is that since the house body is done in shingles, I don’t have to scrape them at all. I will merely clean and re-stain them. I am starting in back and will do all the rafters and trim first, stain the body, then go and heat gun the window trim, and do that last. I’ll continue my one side at a time approach.

At Pete’s we ripped out the vinyl kitchen floor, the original brown linoleum floor under it, and the plywood it was attached to and got down to the sub floor. They have a really nice mid century modern that he and Susie have lived in for over 20 years. Susie and the girls took out the short wall between the dining room and the kitchen, and Pete removed all the cabinets. They are doing a complete update and yesterday we installed a new oak floor in the kitchen. So we got to pull out the ramsond nailer. Some form of “Ramsond Floor Nailer” is our perennial top search term.

We also completely emptied their house into a PODS (Portable On Demand Storage) unit in their driveway. I got to use my old-summer-job-with-the-moving-company spatial skills as we packed it up. The flooring company is coming to redo all of their first floor and will sand and stain the new kitchen along with the rest of first floor. I told Pete if he lived a little closer to campus he could have bought the PODS and then sublet it to students to live in come fall...

Of course I have been performing both tasks this week with one arm swathed in gauze and bandages because I seem to have ANOTHER case of to-photo-dermatitis. I can’t believe it happened again, and I don’t know where I bumped into wild parsnip! While the floor nailer is the number one search term, far and away the most popular image search is this one, and that is just yucky.

Sunday, June 10, 2007

Chautauqua

University Heights had its second annual Chautauqua today and I must say for a town of 1,000 we did ourselves proud.

The warm up event was the garden club tour from noon to 2:00. There were eight gardens open for touring. Rowan and I took the tandem bike out and hit them all. They were very interesting; most were like us and have to deal with a lot of shade. There were goldfish pools, comfy sitting areas, and wonderful displays. There was a scavenger hunt which Rowan really got into and submitted her sheet at the end for a prize drawing. She won a personal fan and was delighted!

Triangle Park (which passes for our only public space, even though it’s privately owned.) was the site of the Chautauqua. A tent was pitched and there was entertainment from 2:15 to 4:15. The Polka Dots, a polka band of retired folks, including several U-Heights residents, kicked off the afternoon. Next up was a female barbershop quartet, then readings from the Iowa City Senior Center’s theater group. Then a classmate of Rowan’s and his grandpa recited “Casey at the Bat.”

Second to last (the prime spot in Vaudeville shows) were the “Surprise Golfview Ave. Musicians.” I played banjo, Dr. Mike, our next door neighbor, played bass. He and I played together in our band, “Acoustic Mayhem,” for nearly ten years, before he went on emeritus status. Rowan was our fiddler. We did a handful of fiddle tunes and songs and were well received. Rowan did great, she really has ice water in her veins, and has the classic bluegrass deadpan already that I just can’t seem to achieve.

Finishing the day was Susan Short Gilbert whose one person play about her grandmother’s experiences as a midwife, won best original script at the state community theater festival. It was great!

Laurel says she gets to be part of next year’s show.

Wednesday, June 06, 2007

Border War

This really isn't about conflict, I hung the "Prairie Frieze" border in the dining room today. Here's a little step by step:

Here's what it looked like as I started. The picture rail is just below the ceiling. I've never hung border directly onto a painted wall, our old house had every room papered except the hallways.


I am a big fan of red rosin paper. I have two basic work areas when hanging paper: the cutting area and the pasting area. Each one gets a generous helping of rosin paper. Here is the cutting area:


The tools here are my 18 inch right angle, pencils, scissors, razor blades and measuring tape. (Tape really isn't critical for borders until the end I suppose.)

Here is the pasting area. As I said, I'm a big fan of rosin paper. I also use some of that cheesy vinyl carpet protecter your great aunt had in her living room. It's great for keeping the paste in the area you need it and I find I'm less likely to accidently step into the paste.


I use a regular wheat paste type glue, buy the stuff as powder and mix up in a big bucket. Bradbury (the paper maker) recommended putting glue on with a roller. I did the first piece that way and immediately went into the basement for my brush. Overkill for border, but I always put an arrow at the top of the back side of every piece of paper before I put paste on to make sure I'm not hanging upside down when I get up the ladder.

After pasting the back you are to "book" the piece. In this case it means folding the ends in toward the middle. I always make the side I'm hanging first a little smaller than other side. It just seems to be easier to handle that way.


Then you roll it up and let the paste soak into the paper. Brabury papers are NOT pre-pasted. They aren't trimmed either, that's a fun job I'll have to document in a future post. Directions say wait 5 minutes before hanging. I like to wait 10.


Here is the first section put up in place. This border has a 13.5 inch repeat. I cut my first length 3 repeats long (40.5 inches). That's a pretty easy length to handle especially for a first piece.


I do a lot of calculations before I start to hang, I figure room perimeter, divide that total by the pattern repeat, figure each wall separately, and then don't look at it once I start working. I did remember that my pattern repeat for the room would be 49.2. I decided to overlap each piece between and an eighth and a quarter of an inch to try to get rid of the extra 2.7 inches I'd have left at the end.

I got down the first wall pretty easily. At corners I always take a razor blade and slit the border so that each wall is separate. I didn't do that on one job at our previous home and that's where the border came loose, in the corners.


I seem to have over corrected a bit much, I came in with just over 50 frieze sections instead of 49. I knew I needed a funky bit to finish up, and to my surprise the sample border piece, that has been hanging on the wall since March, was nearly an exact fit!


So I peeled the info label off the back (here's another great use for red rosin paper) and slapped the paste on it. It hung great.


Here's a picture right after I finished. Tonight Lisa washed off the excess paste and we'll put the rest of the furniture back in tomorrow.

Sunday, June 03, 2007

How to Salvage a Floor

Friends of Historic Preservation had its final salvage at two houses in Cedar Rapids this morning. Here's a quick little step by step in how we salvage flooring. The floors in both the houses were 2.25 inch wide plain red oak. The floors, like the houses probably dated from the early 1920's. These were modest, but nice homes.

The first step is to remove the base shoe and baseboard all the way around the room to be salvaged. We saved the base, and discarded the shoe by putting it into a closet. The next step is to find which way the "tongues" in the tongue and groove flooring point, we always pull from the tongue end of the room. This was easy to determine because we could easily see that when we removed the cold air return grates (which we also save).

We start by wasting the last row, by hammering our pry bars into it and splitting it so we can start on the next row. To salvage a floor you need a two foot long flat bar and a hammer. You hammer the bar under the end of the floor and pry gently to loosen and lift the board. If you pry too hard too fast you will break the bottom "groove" off the back end of the board which is sitting under the "tongue" of the next board. In starting in the living room this morning we had two groups each working beside the fireplace:


After pulling the short sections on either side of the hearth, the two groups then could spread out across the room and remove floor boards, with each person working an area easily within reach.


By working together you can easily loosen boards and then hand the board ahead in the area you have already worked. Here is where we've really developed our "system" to work quickly and efficiently with volunteer labor. After a quantity of boards has been pulled The "Denailers" start to grab boards and remove all nails that are left. Tongue and groove floors are nailed through the tongue so the nails are invisible in the finished floor. We remove nails by pulling them through the back of the board. Most floor nails of this era are similar to finish nails in that the heads can be pulled through. Most modern nail pullers that you can buy at the box hardware stores are not very good. The handles are two short. Paul, our salvage barn manager has an antique pair that are almost a foot long, I am keeping my eye out for a set like that. (Can you guess what my job was today?)

After the boards are denailed they are bundled and wrapped. Here is how we have been able to utilize volunteers that would like to help but are fearful they may not have the skills or strength to do most salvage jobs.

We set the bundlers up with folding sawhorses and banding tape. They put two boards together, joining tongue and groove. I recommend stacking bundles 5 boards high, for a total of 10 per package. I'll explain why in a moment. Here is one bundler working:


Here is a completly wrapped bundle:


After a bundle is wrapped we measure and mark it. If you have ten in the bundle you measure to the nearest foot the length, (we recommend always rounding down) and then add a zero for the total linear foot length. We write that number on the bundle and the job site (to make it easy for someone buying the stuff to get floor that matches. Its fast writing the linear foot length and at the salvage barn I made a table that tells you what to divide the linear foot total by to get the square foot amount. 2.25 boards are easy, divide linear feet by 5.

In just under an hour our crew had pulled the living room:


All of this floor is going to Tom and Shelly, who helped pull today, so we loaded right into their pick up truck. What we pulled today, added to what we had pulled last time, wrapped but couldn't take with us added up to 1559 linear feet, roughly 300 square feet. Here is how it looks in the back of the truck, the shorter boards are all hidden in the bed, but we had quite a few long lengths:


So we started today at 9:45 and by 12:00 everyone was ready to go home.

Friday, June 01, 2007

On Closer Inspection

In looking a little closer at the 1928 letter from J.H. Hunzinger Co's Herman Smith I got to thinking about where the company used to be. The letterhead lists 29 N. Governor St. as the mill site with offices at 821 E. Jefferson St.

I thought about the mill site first. The north-south divider in Iowa City is Iowa Ave. This is the street the runs due east from the Old Capitol site. 29 would be in the first block north. A quick look on the assessor's site turned up no such address today. I then turned to the office and 821 E. Jefferson today is a medical building. (my childhood doctor's old place) Records show the office was built in 1968. Here it is:


I remember a large empty lot to the front of the property. It looks like the lot was divided and an apartment building was put up in 1979:


So looking at the map today here is how the neighborhood lays out:


I'm pretty sure what is today called 831 E. Jefferson used to be 29 N. Governor. The two properties were probably sold as a single unit, the mill site cleared and the 821 address used for both. When redivided the entrance is on Jefferson so the new 831 address was created.

Most of the rest of the neighborhood dates back to the Hunzinger era. Here is what's across Governor from their old site:


And what is across Jefferson:


This was a fun little exercise. I know that the state historical society has a 1938 Sanborn fire map, I'll try to get over there to check out how the site was listed in the era right after Hunzinger would have left.

A couple of "small world" paradoxes involved with Hunzinger in the last two days:

1. The sites listed above, in addition to being my old doctor's office, are 4 blocks from our old house (Jefferson and Van Buren)

2. In looking at Hunzinger's web site yesterday, one of their testimonials was from a Milwaukee area school superintendent, David Cronin, who used to the be superintendent in Iowa City. When I was president of the local teachers' union I often dealt with Dave.