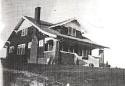
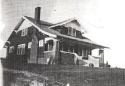
Wednesday, July 25, 2007

Scr*w the Timetable!

Every time Lisa asks, "When are we going to do the kitchen?" I always answer, "LAST!" because we always come and go through the kitchen door and I want all the other messes finished before we do it!

I came home yesterday from the office to see Lisa grinning like the Cheshire Cat. For the last few days she's been on "vacation" which means she was stripping doors.

"Go in the kitchen." she said. When I walked in I saw this:


Which when I looked closer was this:


If you see the "babyshit brown" color on the table leg, that is what all the woodwork in the kitchen is painted. I am nearly finished repainting the cupboard doors, and will hang the last of them tonight. (Imagine that brown on the outside and signal orange on the inside of the cupboards. Lisa reapainted the insides even before we moved in two years ago) The top of the table was that color too, until yesterday. What you see is how it looks after stripper, but no sanding. It was originally painted, but we'll go ahead and stain and varnish since it looks so good. Now we'll see if we can strip the bench and get as good a results.

So last night after getting the kids to bed and taking the dog for a walk I was inspired to try to take the formica off the counter top and see how the original pine top looked. So I peeled off the edge:


And started peeling off the top:


It wasn't too long and I was down to the plywood that covered the original top:


I got out the cordless drill and a mere 76 screws later had the plywood off:


It looks as though the original was shellacked then varnished and in spots the varnish failed and then of course the shellac would too in short order, so it all got covered up. Lisa started cleaning with hot water and TSP:


Here's the end that's down to bare wood:


And another shot


Maybe this was just an extreme way to clean all the junk off the couter?


Ideally if I can get the entire top off there is a cabinet maker in town that I could take it to and run through his planer to take just the very top edge off and get it looking good. Anyone out there do this? What are suggestions as to what to finish it with? I'd love to hear your ideas.

Tuesday, July 24, 2007

Square Deal

"Square Deal" was a term used by Teddy Roosevelt in describing how he approached social problems. Our house doesn't go quite as far back as the first Roosevelt administration, but I'm pretty sure the last time the garage doors were closed, before yesterday, was during the Eisenhower years.


The reason the doors haven't closed is because the front of the garage was racked so far out of square the doors couldn't shut. I last wrote about the garage right before the 2006 elections:
"Very Scary House Update"

My neighbor, Russ, came over yesterday with his "Come Along" that he said he'd used to straighten barns at his parent's and in-law's farms. We drilled a hole through the sill plate and foundation on the one side of the front and set in an eye bolt:


Then we did the same up high on the other side:


A Come Along is a portable winch. In our situation we are using it to slowly pull the side of the garge leaning out (the HIGH bolt) back into straight by using the ground (the LOW bolt) to steady it. Of course this also moves the side that is leaning in back as well. The leaning in side (right side in the first picture, above) is the side where the doors were bound up and couldn't move.

Russ' come along is a thing of beauty, an antique:


It has TWO ratchets instead of the one so pushing the bar forward engages one ratchet and back does the other. Here is the winch and bar:


My analogy of the value of two ratchets is somewhat like taking half steps on the stairs intead of alternating feet: you are not putting as much work into each step! Here is a close up of the winch itself:


Yesterday morning we put in the bolts and tightened the ratchet until the garage started to "sing" (Russ' term, he's a musician too) Then last night I moved it two ratchet steps again. That was enough to free the stuck doors. This morning I did another two steps. I'm guessing it will take at least 10 days to straighten the garage up (I plan to over correct a little) Then I will nail 3/4 inch plywood over all of the available front (There isn't much room, barely a foot on either side of the doors) and over the top to function as a brace to keep it in place.

Now if I can actually get a car in the thing before winter I'll be like the other Roosevelt president and be singing "Happy Days are Here Again."

Thursday, July 12, 2007

Hole in the Bottom of the Sea

Do you remember Magic Drawing Board from the old "Captain Kangaroo" show? That was one of my favorite parts of the show. (Along with Mr. Green Jeans setting an upright bass across his lap and playing it like a guitar.) The basic idea was that this screen illustrated songs and stories that were told. One of Magic Drawing Board's best numbers was "Hole in the bottom of the Sea" a cumulative folksong. We had our own little version of that happen in our front yard this week.

I had reported on the new water main that was being installed last month in Week in Review. Tuesday was our day to get our line hooked into the new main. The morning started with a backhoe opening up a work hole across the street to access the new main:


Then they needed to open up a hole big enough for a person to stand in and connect our line to the main:


So far so good:


You can see the shut off here. What happens after the two holes are opened on either side of the street is that a horizontal bore will dig under the street to open a hole for the new line. This is a much smaller version of what the City did when digging the new main line under the sidewalk, and what we did in our geothermal system. The water workers refer to their little bore as "The Mole."


A worker went in to do a little hand digging to expose our line and that's when things started to go a little funny. A pocket of gravel (washed rock" to the water guys, they know their terms for what you might find underground) opened up next to the water line:


And it grew:


And it grew! At this point the backhoe moved because so much gravel had poured out from under the street bed that the fear was that the where one the feet was planted would cave in.


That was when I had to leave and go teach a workshop. Lisa called at noon to tell me that the hole was now twice as big as what they had said they needed. She called again at 2:00 to say that the workers tried to use the mole and the hole collapsed around it before they could get across the street. Then they sawed open a channel across the street and started digging the whole thing out with a backhoe. She said then they stopped and pretty soon the Mid American Energy guys came along. There was a big confab and lots of pointing into the hole. It turned out that the backhoe had nicked the plastic casing on a gas line. Mid American checked and pr0claimed everything safe. When I came home at 5:00 our water was on. The hole in the street was covered back up and gravel laid over it


The hole in our yard was so big they didn't have enough dirt to completely fill it. Yesterday they came with a truck load and filled it all back up:


Lisa said that they had completely filled the other side of our lower front yard (where all our geothermal piping is, so I was very diligent in mentioning where it was) with dirt and cement while opening up the street. But by the time I had come home they had cleared it all away:


My guess is that the gravel was dumped into a big hole created when our sewer line was replaced 15 years ago but never really packed in. I am very impressed with the water workers, they are polite, good communicators, and very diligent!

Monday, July 09, 2007

Buster Oxford Brown

I started staining the shingles in the back of the house yesterday and I am totally sold on stain. Not having to scrape or heat gun off the old stuff was enough to convince me! I have to admit I did need to change a few techniques right away, but once I did things went smoothly.

The first change is to hold the brush closer to the bristles and at more of an angle. Since the stainis so much thinner than paint it really does run if you’re not careful. The other change is that rather than paint horizontally across a course I need to do more of an up and down motion to get the stain to penetrate into the grooves of the shingles.

I started at the back door and worked toward the driveway. Here is the first couple of shingles with stain:


The color is "Oxford Brown" which seems pretty close to the color that has always been on it, but since the last time it was stained was 1984, it has faded a little. Here is a shot after I got to the first set of windows:


You can't see it above, but the places where I patched the woodpecker holes are still shiny and do show up, but I will live with it.


Here is a close up of the patch I demonstrated on in the last post:


The other thing I notice it that everywhere that the previous painter slopped white trim paint is now VERY noticeable. I do have a quart of paint that matches the stain, so I'll probably just carefully cover them.

Friday, July 06, 2007

Take That, Woody!

I have the larger section of the eaves in back nearly finished so now it's time to get ready to re-stain the shingles. I washed them yesterday to clear off the muck. According to the repair notebook the house was last stained in 1984.

Helen (Bess' daughter) was very much the naturalist so that nothing was ever trimmed or cut back. Consequently many trees were allowed to grow over the house and the back was covered with an out of control trumpet vine. This all means there is a lot of woodpecker damage to the shingles.

On the advice of an excellent fix it guy, I went to the local brick/stone place yesterday and bought a tube of NP-1 masonry adhesive/sealant. I got brown pretty close to the color of the shingles:


Here is the biggest hole in the back:


I filled it with the sealant:


I used a leftover piece of shingle as my putty knife, this helps to ensure that there will be ridges in the patch like the shingle itself rather than being smooth. My hope is that this will make the patches less noticeable.


Here it is after dragging down over the hole:


I then took my shingle-knife and dragged back up:


I also managed to cover the little hole above the big one:


I'll need to call the masonry place today, there is nothing on the tube saying how long it takes for the stuff to harden. I'm hoping that after I stain everything else the patches will be nearly invisible. I finished the back in a little over an hour this morning.

Thursday, July 05, 2007

Holiday Plumbing

Rob, my childhood friend, his wife, Helen and their daughter, Hannah stayed with us over the 4th of July. They all live in Los Angeles, and get home to the midwest all too infrequently. As is often the case their arrival coincided with a small plumbing crisis. The hot water faucet on the sink gave way and was spinning 360 degrees while the water ran full force.

Compounding the problem was the fact that the kitchen sink water lines don't have shut offs. I shut off the main and we survived on drips and buckets of water we filled. I was able to get a temporary fix that allowed the water to go back on before we left for City Park to have a picnic supper and stay for fireworks.

The park was wonderful, the fireworks spectacular, if a little erratic. (There were several 5 minute delays during the display and then they randomly shot off more after most people were already in their cars on the way home.

This morning, after bidding our guests as sad farewell, I took on the faucet. I had gone out to the salvage barn and gotten several faucets so that we could at least get a better fix while we decide what to do long term.

I pulled out the salvaged faucet I had put in last year:


I had a heck of a time removing the threaded posts, but they finally gave way:


Now I had a clear shot at the water lines:


Then I installed separate hot and cold faucets:


This situation is similar to what the original plumbing was like:


The third faucet would have been for well water. Those lines are all cut, and I have no idea where the cistern is, or where the water came into the house. I'd really like to know that.

Here is a shot youngest daughter took of me doing the piled up holiday dishes:

Monday, July 02, 2007

Come On In! The Water is....

Absolutely Frigid.

But that didn't deter either child from spending the nearly the entire day in the pool yesterday. With a high of only 79 it was none too warm. Here was the patio base on Saturday morning before we started setting up the pool:


Here it is this morning, I forgot to get pictures yesterday.


Besides our kids there were a bunch more in the water yesterday too. My softball team had a 5:00 game at the nearby Hawkeye diamond so everyone came for a picnic afterward. Our coed rec team plays in the "D League" only because they don't have an "F League." The team is made up mostly of school district administrators and tech staff along with spouses and adult children (we are the oldest team in the league) So we had Callahan kids, and Keller kids getting wet too. Also Sam, who is one of our players, and a college student at UNI, brought her suit and got mobbed by the kids. Sam's parents both play for us too.

I'm guessing that my carrying 3.5 tons of limestone last week had some positive transfer in our game last night. At my age I am resigned to being a singles hitter and not much more. Last night I put two over the outfielder's heads for a triple and an in-the-park home run. (The fences are ridulously deep, so if you get it over the outfielders you are nearly guaranteed a triple. I don't think I want to keep my wieght training up all summer. Since the patio is finished I'll be back under the eaves today scraping and sanding.