Tuesday, November 28, 2017

Beer Update (and Thanksgiving)


Scott stopped over last night and we siphoned the beer out of the fermenting bucket and into a glass carboy. We will let it rest in the carboy for a week or so before bottling it. I had taken the fermenting bucket down to the basement on Sunday, so that sediment stirred up in moving would be settled back down before siphoning.

Here is the fermenting bucket after removing the lid. There was a very strong beer/hops/alcohol scent:
 Before we opened the fermenter we had already sterilized the carboy (again, since I had done it last week too) and the siphon tube and hose. We then started the beer into the carboy:
After it had run a bit we filled the beaker for the hygrometer so we could test specific gravity again. We tested it last week, and got 1.56:
 Now specific gravity was 1.011, with a quick calculation we know that the alcoholic content is almost 6%, which is right at the target for our recipe. We filled a mug and tried it. The taste is not overly “hoppy” and is very pleasant. We brewed using my hops that I transplanted to the back yard in 2011 from the ancestral family farm in NW Iowa.  Since the hops were likely a type of German Noble, they are relatively low in alpha acids, meaning they are not as bitter as many modern varieties. While the beer tastes and looks good, it does not have very much carbonation. That is what we will create when we bottle it, by adding just a bit more sugar to stimulate yeast activity.
So the beer is now in the carboy and in the back room upstairs to sit at a warmer temperature than the basement.

Besides beer activity, we hosted Thanksgiving as usual. We only had 10 on Thursday, the smallest group we have ever hosted. Several weeks ago, my Dad pointed out that the local grocery chain had a special of “buy a ham, get a turkey free.” I went and did that. The turkeys were small and the biggest I could find was 9 lbs.  While at the store, I noticed that they also had frozen goose, so I bought one of those too, and we are set for Christmas.

Imagine my surprise when I went to brine the turkey on Tuesday night and I discovered it was only half a turkey! The drumsticks and lower portion of the body weren’t there. If I hadn’t been so distracted by the goose, I might have noticed this when I bought it. So it was good we had the ham to go along with the white meat only turkey. Here it is before I put it in the basement oven:
While getting ready for Thanksgiving this year that I discovered that we have 4 turkey sized granite roasters, a smaller chicken sized granite roaster, and an aluminum rectangular roaster. I’d say we’re set for everything. I made one version of stuffing in the chicken roaster and used the most interesting looking turkey roaster for our half bird. Here it was after 2.5 hours of cooking:
And after carving:

We used our special Thanksgiving tablecloth and got out the good dishes and silver:
So the near record highs on Friday allowed me to get out while everyone else was shopping to put away all the summer porch furniture and rugs, and allowed me to even wash the porch floor before winter:

I even put up Christmas garlands on Sunday in my shirt sleeves, I’ll need to get a picture of them later.

Sunday, November 19, 2017

Basement Shenanigans


Today I took the first major step in a plan I’ve been ruminating on for the past year or so.  Scott, one of my school district instructional coaching partners, came over with his beer making equipment. We went into the basement.

First we started 3 gallons of water to heat on the stove.
When the temp reached 172.5F we poured the water over 11.5 lbs. of varied malted grains that we had worked out in a recipe last week. Those grains were in a container with a spigot at the bottom. The malt had to steep at a temperature of 156F. If the temperature gets too hot the starches won’t convert to the correct sugars needed later when the yeast is added.

The malt needed to steep for about an hour, we added more hot water occasionally. Eventually we started draining the mix to reheat it on the stove and pour back over the top in order to release all the sugars from the grains.
Finally we had the liquid (roughly 5 gallons now since we’d been adding more) drained into the big pot and we turned up the heat to get it to boil. All that was left in the strainer was the wet malt.
Once the pot started to boil we added 4 ounces of hops. I picked these from my backyard in September. I planted these hops from shoots I’d gotten from a farm that goes back 6 generations in our family. They were likely brought by an ancestor who was a saloon keeper in Luxembourg. After half an hour we added more hops, and more again after 45 minutes, and finally again when the mix had boiled an hour. At this point we took our wort off the stove.
Now we need to lower the temperature of the liquid to 99F so that we can add yeast. Rather than wait for hours for this to happen we placed a pipe coil inside the pot and hooked it to the sink. We ran a slow stream of cold water through the pipes to lower the temperature.
When it reached 99F we spooned enough out to fill a graduated cylander later, when the mix reached room temperature we would be able to float a hygrometer to tell the density or specific gravity of the liquid. If we know the starting gravity we will be able to later measure and determine the alcohol content.  
Then we needed to pour the beer from the kettle into the fermenting bucket. We added the yeast mix to the bottom of the bucket before we started pouring. Since we had used my hops we needed to get them out of the mix as we poured. We used our old applesauce sieve to strain out the hops
Then we fastened down the top and put a vapor lock on it. That will allow the CO2 gas to escape as the yeast digests the sugar and turns it into alcohol.
I put the bucket in our back room upstairs since the basement is a little too cold for good fermentation. Next Sunday we will check it and probably move it to a 5 gallon carboy for further fermentation.
I checked the specific gravity later and the reading is 1.54 which is pretty darned close (1.58) where we need it in order to have a final alcohol content of 6%.
 So I never mentioned why I’m doing all this now. My goal is to have a beer to celebrate the end of my career in public office. My term as City Councilor ends 12/31/2017 at midnight. Out of Office Ale will be ready on 1/1/2018

Tuesday, May 05, 2015

Kitchen Update #2

I was able to install more trim over the weekend. First I had put to put 1 x 4 around the back door. Somehow I managed to lose the piece that went on the left hand side of the door and was cut out for the door lock catch, but waiting 10 years after removing it, that will happen... I did find the piece that went over the door, but that was no good to me, since originally the right hand side of the door was a perpendicular wall. With that wall removed I needed to cut a right hand side panel and then have the top go over it, so the original was too short. I picked up trim at the Salvage Barn. It was three pieces painted all over 84 inches long. Since it was painted it was half off, so I paid $8.00 total.

I stripped the paint off the boards, sanded and then cut them to fit. I then primed, painted and installed over a two day period. I think the part around the lock turned out OK.

My picture is bad but here it is now:

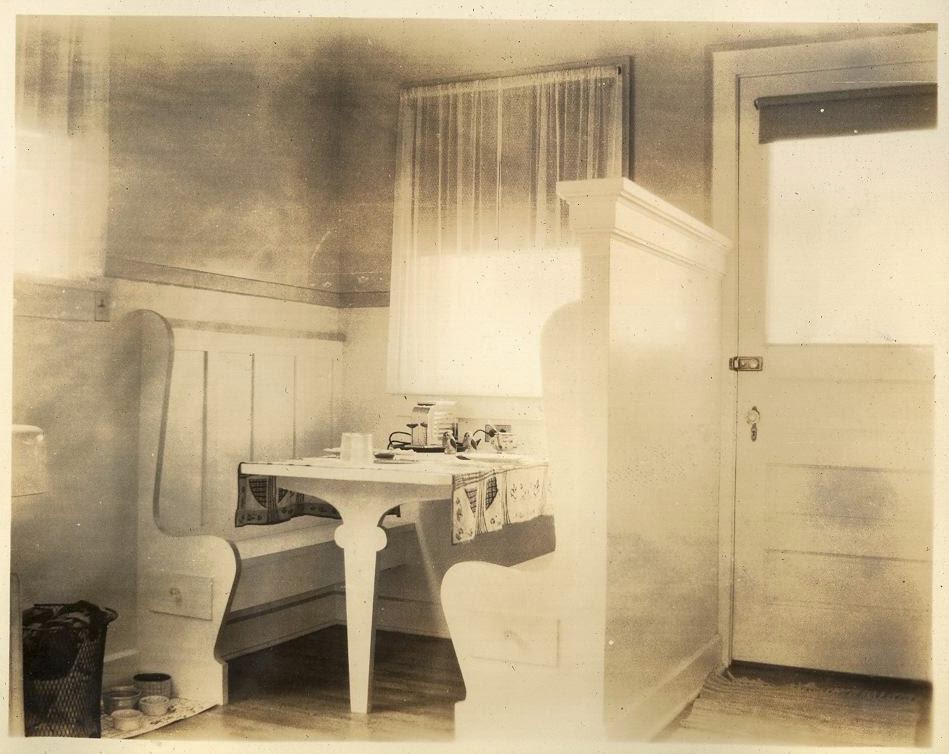
 Compared to how it looked in 1928:

In my defense, because we took out the closet to the right of the door we had to make both sides match, and be part of a single plane which they weren't originally, so we had to install a shim under the trim, which recesses the lock catch a bit.

Up next: Getting back band cut and fit around the back door so I can then complete baseboards, and the upper trim.

Wednesday, April 29, 2015

Kitchen Update #1

Here is a first kitchen update after announcing that we were actually doing something.

Last week I finished painting the wall and some trim. Here is a shot of the sink and the edge of the cupboards:


Since I've taken this picture I have:
  • returned the brass switch and outlet plates
  • put up the trim at the top of the cupboards
  • added the trim that runs around the kitchen between the window and cupboard
  • added quarter-round to the baseboard
  • added base shoe to the cupboard toe kick area
Here is a picture of the nook:


I just se the table in place, I haven't attached it yet. You can see the trim above the nook, that will run all the way around the kitchen.

What I'm working on now:

  • trimming out the back door
  •  baseboard for the exterior wall on both sides of the door
  • upper trim on both sides of the door
Hopefully I'll have some more pictures to share in a couple of day...

Thursday, April 23, 2015

Last MAJOR INTERIOR Project, REALLY!

I know it's been quite a while since anything was published, but I want to say that the LAST MAJOR INTERIOR PROJECT at Foxcroft is well underway: THE KITCHEN.

Every time Lisa has asked when we would do the kitchen, I have answered "Last." This is because nearly every other project required us to track materials in through the back (kitchen) door.

Over spring break we had plasterers come to fix the corner where we had removed the bump out that was Bess' closet from her bedroom. We had removed the closet a mere 10 years ago in June of 2005.

While I will flesh this out and give details about what we've done in the near future, here is a photo montage of the kitchen from when the house was built (1928) through today, in progress:

BLUE PRINTS
Here is the kitchen layout from the blueprints. The back door opens between the half wall of the nook, and a bump out bedroom closet. This would have been extremely narrow. The small area marked "Brooms" was another closet, that opened in the kitchen. The fact that Bess was getting an ELECTRIC REFRIGERATOR rather than an icebox was a big deal, and noted in the plans:

One of the most charming parts of the kitchen plans was the breakfast nook. Bess had found separate images of how she wanted the table and the benches to look, and given them to her designer:

1928 Photos: 
THESE 4 PHOTOS WERE ALL TAKEN SHORTLY AFTER THE HOUSE WAS BUILT.
For ALL PHOTOS below click on the image to see a larger version:


This photo was some time after 1928 and before 1948:

In 1948 the half wall and bench of the nook were removed.
These photos are probably shortly after that:


The next three images show what the kitchen looked like the first time we were in the house on Dec 19, 2003:


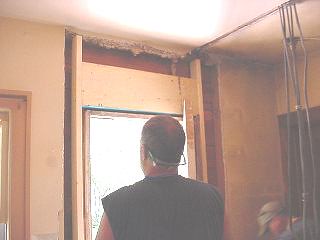
The next four photos show removing the broom closet, and the bump out bedroom closet
on June 9, 2005. Read about that here:


We had to put a header over the back door to carry the load of the gable we added upstairs. the first photo below shows that. The second photo shows the  light switches shown on the bump out above that had to be relocated, this would be about a week after the pictures above.


So here is the kitchen after the plasterers came, and I just finished varnishing the floor. There will be more updates to come.